

Warrington to Lymm – Low Level: 150 Years of Change by Mr Bert Harris – is an extended account of the Warrington and Stockport Railway (Low Level Line). Bert begins with a brief history of railways in Warrington and then through words and pictures describes how the line was built and what became of the route when the railway line was closed. He finishes off with an account of a local resident who witnessed everyday life on the railway during his lifetime.
All photos and text in Warrington to Lymm – Low Level: 150 Years of Change are © Bert Harris, except the Making Tracks banner, which is © GI Gandy / mywarrington.org.
Introduction
Chapter 1 – How it all Started
Chapter 2 – Lymm to Warrington – The Original Route
Chapter 3 – Changes Caused by the Manchester Ship Canal
Chapter 4 – The Route of the Line as it is Now
Chapter 5 – Memories and Reflections
Appendix 1 – Glossary
Appendix 2 – Diagram of the Line Before and After the MSC

Introduction
Warrington is a railway centre of vital importance to the national railway network as a whole.
Within Warrington town itself, the former LNWR West Coast Main Line on its way from Euston to Carlisle is bisected by two east-west lines.
What remains of the lesser LNWR Altrincham to Liverpool line, known as the Low Level, passes directly underneath at Bank Quay Station.
The former Cheshire Lines Committee Manchester to Liverpool route, via a loop from Padgate Junction to Sankey Junction, serves the town’s Central Station and crosses over the main line north of Bank Quay.
The former Liverpool & Manchester Railway Manchester to Liverpool route is also the route from Manchester to Chester and North Wales.
This is accomplished via a connection with the West Coast Main Line at Earlestown where it turns south and passes through Bank Quay.
It then heads off towards Chester from Acton Grange Junction, which is at the south end of the Warrington rail complex.
Warrington thus enjoys a key position in the middle of a network running from north, south, east and west. In the photo, right, the West Coast Main Line, from left to right, is running southwards. The loop line, from left to right on the overbridge, is running from Sankey Junction to Central Station.
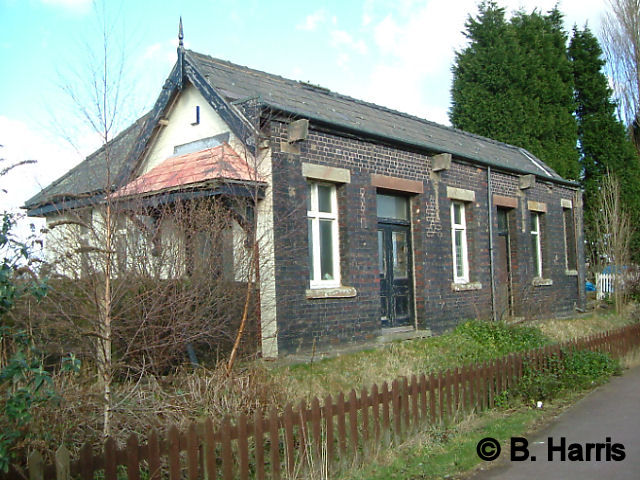
The first image shows a typical station on the line, Heatley & Warburton Station on the east side of Mill Lane on the modern Trans Pennine Trail.

The image below it shows the West Coast Main Line with the former Cheshire Lines Committee line going over the top.
Chapter 1 – How it all Started
Warrington’s railway history began in 1830 when a line was opened from Liverpool (Crown Street). It passed through Rainhill where the famous Railway Trials were held, then through Newton Junction to Manchester (Liverpool Road).
A year later the Warrington & Newton Railway opened. It ran from Newton Junction (Earlestown) to a station at Dallam Lane, a distance of 4¼ miles. This new railway, which was in fact a branch line, included a short goods branch to Liverpool Road, just to the north of Bank Quay.
Within a few years, the famous Grand Junction Railway from Birmingham was under construction. Running via Crewe, it was a vital link in the creation of the national rail network.
Approaching Warrington, it crossed the River Mersey by a sandstone bridge, known as Twelve Arches, to join the Warrington & Newton at Liverpool Road where a new station was established in place of Dallam Lane. This meant that the station at Dallam Lane was no longer required. Dallam Lane, however, continued to serve as a coal depot and private sidings until the late 1960s.
Opening on 4 July, 1837, the Grand Junction Railway not only gave Warrington fast and direct transport to major centres in the south for the first time, but, via the Warrington & Newton (which it bought in 1835) and, via the Liverpool & Manchester, created the first main line between Liverpool, Birmingham and London. Warrington continued to hold this position until the opening of the present route through Runcorn in 1869.
In 1853 it was the turn of the Birkenhead, Lancashire & Cheshire Junction Railway, which opened from Chester.
It crossed over the GJR at Norton then crossed it again, on the level, at Acton Grange Junction before crossing the Mersey by a steel bridge, close to the Twelve Arches, but just to the west of it. This line was later renamed the Birkenhead Railway.
The St Helens Canal & Railway Company, which was part-owned by Warrington brewers Greenall’s and banker William Parr, built a branch from Widnes. It opened as far as a temporary terminus at White Cross, just to the west of Bank Quay, in February 1853. At the same time the LNWR bought out the Grand Junction whose track it had to use to reach Warrington.

Looking west, shows the elegant Twelve Arches Bridge over the Mersey, with the steel bridge just showing above it.
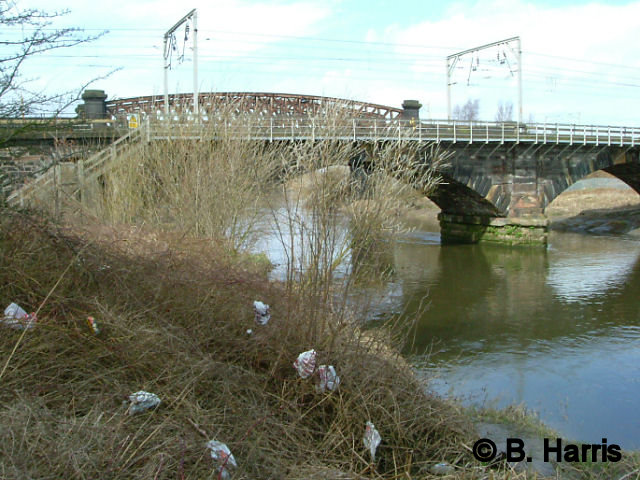
The hog-backed steel girder bridge just beyond the sandstone bridge.
It had been intended that the St Helens Canal & Railway Company would join the Birkenhead, Lancashire & Cheshire Junction Railway at Arpley. In the event the BLCJR stopped at Walton Junction, before it reached Arpley. This not only left the St Helens Canal & Railway Company at a dead-end but the BLCJR itself was at the mercy of the LNWR.
Coming in to Warrington from the east was the Warrington and Altrincham Junction Railway. After securing powers for an extension to Stockport it was renamed the Warrington and Stockport.
After some delay in completing the bridge over the Mersey at Wilderspool, the Warrington and Stockport opened on 1 May, 1854, to link up with the St Helens Canal and Railway and establish the so-called Low Level. The line was double-track along its entire length.
The Warrington and Stockport was operated by the Manchester, Sheffield and Lincolnshire Railway. After acquiring the Grand Junction, the LNWR took out a lease on the W&S in 1860 and then the SHCR in 1864, giving it a virtual monopoly of lines into Warrington.
A year later they overstepped the mark when they stopped the Manchester, Sheffield and Lincolnshire from using the Low Level. In the event this led to the end of the LNWR stranglehold on Warrington because the MSLR formed a partnership with the Great Northern and Midland Railways. Together they formed a joint railway called the Cheshire Lines Committee. This new line, designed for fast running, would bypass the centre of Warrington. However, local pressure forced the committee to add a 2-½ mile loop through the town centre via a new Warrington Central Station.
In 1868 the LNWR replaced Liverpool Road and Arpley stations with a new two-level station at Bank Quay. Here the West Coast mainline crossed over the Low Level. However, a legal requirement forced it to reopen Arpley in 1871.
The CLC, via the loop which went from Padgate Junction to Sankey Junction, was opened in the early 1870s and Warrington Central on 1 August, 1873. The originally planned direct line opened for freight and non-stop passenger trains in 1883, thus completing Warrington’s main line network.
Towards the end of the 19th century came a major change to the area in the shape of the Manchester Ship Canal. This required major line deviations and the construction of substantial new bridges.
No longer would cargo be trans-shipped to and from trains at Liverpool or Birkenhead for the Manchester leg of the journey. The railways would lose traffic so they did not welcome having to step aside to let the canal through. They did all they could to protect their interests and delay the canal’s opening.
For obvious reasons the LNWR objected to swing bridges where the canal cut across the Crewe, Chester and Low Level Lines, especially if canal traffic had priority. The canal company was eventually persuaded to use fixed bridges. However, these needed to be high enough for ships to pass under them so the railways approaching them had to be rebuilt on embankments rising to great heights. One of these bridges was built at Acton Grange to carry the Crewe and Chester lines on a single structure; the other was at Latchford to carry the Low Level. The Low Level line realignment enabled some congested level crossings to be replaced by bridges.
Chapter 2 – Lymm to Warrington – The Original Route
Construction of the Warrington and Altrincham Railway began in July 1851, and services began two years later. From the outset the line was double tracked. Each station on the route had platforms on both sides of the track, and each had its own signal box. The railway passed through the village of Lymm and had a large influence on its development. Several large Victorian houses in the village are indicative of the fact that wealthy businessmen were able to live in rural Lymm and commute to their businesses in Manchester.
For convenience we’ll start at the River Bollin and go westwards. The bridge over the Bollin is in the middle of a 3-mile straight running from just west of Altrincham. Some 2/3rds of a mile further west is Heatley & Warburton Station on the east side of Mill Lane, which was crossed by a controlled level crossing with gates. A footbridge joining the two platforms was adjacent to the road. The main station building was on the right of the picture with a waiting room on the left, as shown here in this recent photo, right, looking east. The Railway Hotel was on the west side of the road and to the right of the picture. Heatley Station was opened on 1 November, 1853, and was renamed Heatley and Warburton in 1857.
Heatley and Warburton Station closed to passengers on 10 September, 1962. One of the pieces of evidence against the withdrawal of passenger services in the early 1960s was that the crossings would still have to be manned for freight trains and so the savings would be minimal.
A further 2/3rds of a mile on was another controlled skew level crossing over the junction of Rush Green Road with Birchbrook Road. This was the end of the 3-mile straight and the line bent slightly southwards, keeping straight for a further 2 miles to the bridge under Camsley Lane.
There were a further 4 level crossings in this section. Starting from the Rush Green Road/Birchbrook Road level crossing, the line crossed, on the level, over a minor path, known as Reddish Lane followed by a bridge over a track leading to a sewage works. The second level crossing was over another minor path known as Lymm Hay Lane, before bridging a farm access track.
This was followed by a bridge over Sow Brook, which flows out of the Lymm Dams and empties into the Manchester Ship Canal.
Heatley & Warburton Station on the east side of Mill Lane on the Trans Pennine Trail.
The third level crossing was a controlled one over Whitbarrow Road, adjacent to Lymm Station. The main station building was on the north side, as was the crossing keeper’s cottage, while an Inn was on the south side. A footbridge with abutments at the back of the keeper’s cottage joined the two platforms. The signal box was on the north side of the line on the opposite side of the road from the Station Master’s House.
The fourth level crossing was also a controlled one over Star Lane, just north of the Bridgewater Canal aqueduct. Between Star Lane and Camsley Lane a footbridge had to be built to preserve a pedestrian right-of-way between Camsley Lane and Warrington Road.

The first photo shows Thelwall Station minus its signal box in 2001 when it was 135 years old. Unlikely as it seems, this station had been proudly maintained before its closure in September 1956, often winning prizes for cleanliness, tidiness and best-kept gardens.
This second photo was taken from Stockport Road and looking south, shows just how close the canal is to the line of the railway.
The next underpass was at Camsley Lane. From Camsley Lane it is a further 1¼ miles before the next major underpass on Stockport Road, just northeast of the Dog and Duck crossroads. After leaving Camsley Lane there is first an underpass for a farm access, followed by an underpass at Deans Lane. Next, we come to Thelwall Station.
The main station building was on the north side platform and it had a quite large station yard behind it with the entrance on Stockport Road.
Two sidings branched westwards into the station yard. This meant that any goods designated for the yard had to be reversed in. There was no pedestrian bridge, but there was probably a track-level sleeper pedestrian crossing to the south side platform.
Immediately after the station the line went over Half Acre Lane, squeezing between Stockport Road and the Bridgewater Canal at the point where the canal is the closest to Stockport Road.
The canal and the railway then diverged. After passing over a minor level crossing for a farm access from Stockport Road, the line went under Pickering Bridge, which carried a farm track.
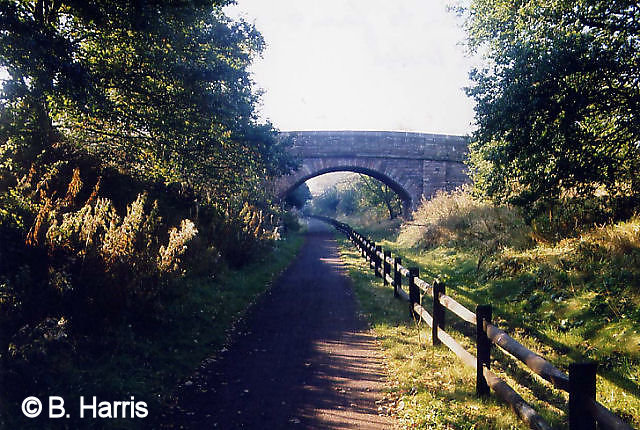
The line then swung northwards and went under Stockport Road. The original, sandstone, bridge is on the left in this photo.
From the Stockport Road underpass the line continued almost straight for just over half a mile, with a level crossing over Bradshaw Lane.
The present owners of the cottage tell me that there were two small windows on the side from where the keeper would lean out to exchange the tokens.
From here the line bent slightly to the west, heading towards Latchford. Just south of Latchford there was a controlled level crossing over Knutsford Road. Another controlled level crossing took the line over Grappenhall Lane where Latchford & Grappenhall Station was situated.
There was no pedestrian bridge, but there was a track-level sleeper pedestrian crossing just inside the gates from platform to platform. The station opened under the name of Latchford & Grappenhall and was in use until the completion of the line over the Manchester Ship Canal on 9 August, 1893, when it closed.
Continuing west from Latchford Station the line started to swing to the north along what is now Common Lane and crossed over a controlled level crossing, which took the line over Wash Lane. The crossing-keeper’s cottage was situated on the south side of the line and on the west side of Wash Lane.

The view looking north along Bradshaw Lane, shows the crossing-keeper’s cottage situated on the north side of the line.
The line continued its swing to the north and crossed over a pedestrian level crossing on a farm track before crossing the Black Bear Canal by an overbridge, which is no longer there. It was situated about 30 yards to the southwest of the present overbridge. It was much lower in height, just enough to clear the barges using the canal. From the canal the line continued straight and level for ¾ of a mile to Wilderspool level crossing over Chester Road. Just before it reached the level crossing a branch line came off it in the reverse direction back towards the canal.
The line split, behind what is now Priestley College, into five shorter branches so that six sidings terminated at the Black Bear Canal. Just prior to the five-split, another branch split off and turned westwards. This again split into two with one of the branches terminating at Loushers Lane. The other branch ran alongside the Black Bear Canal, on the north side.
It was the mid-1950s before the busiest level crossing on the line was lifted.
This was the Wilderspool level crossing over Chester Road. It was replaced by a bridge which carried Chester Road over the line.
The line then crossed over the Mersey to Arpley Station via a girder bridge. Until 1908 this bridge was tubular, similar to that at Menai, but with an open top. For many years the bridge carried an advertisement for ‘Falstaff’s Warrington Ale’.
Warrington Arpley Station had a grand façade and overall roof but only ever had two platforms, although four tracks passed through it.
In 1868 the LNWR lifted the elevation of their Newton to Birmingham line so that it crossed the former St Helens line on a bridge.
This line and the Black Bear Canal then passed under Loushers Lane with the line terminating at Wilderspool Sidings behind Greenall’s Brewery.
They built a new station on two levels with platforms serving both lines.
The Warrington and Stockport Railway was, from that time, known as the Low Level Line.
The new station was called Warrington Bank Quay and it was less than half a mile away from Arpley.
The LNWR did not want two stations so close together on the same line so they closed Arpley on 16 November, 1868. This decision was met with storms of protest from the citizens of the town, as Arpley was closer to the town centre.
The LNWR closure decision was challenged legally and they were forced to reopen the station on 2 October, 1871.
Warrington Arpley Station closed to passengers for the second and final time on 4 September, 1958.
Regular passenger services on the line continued for a few more years, calling at the nearby Bank Quay Station until 1962.
We are looking north in this photo from Loushers Lane in Latchford. The line was immediately behind the crossing-keepers cottage.
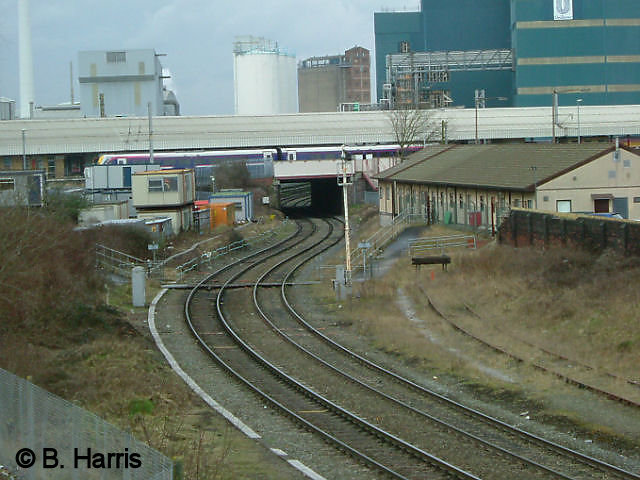
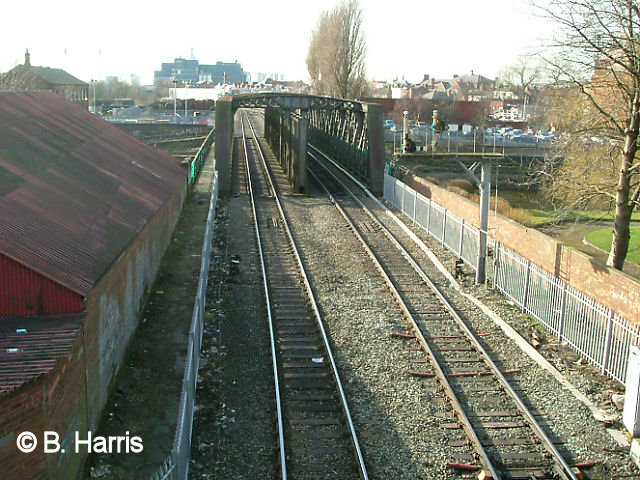
This scene is looking west from Slutchers Lane bridge, shows the Low Level Line passing under the main line. The Low Level Station closed on 14 July, 1965, and was later demolished so that now no trace remains. A Manchester to North Wales train waits on the upper level platform 1.
Chapter 3 – Deviations Caused by the Manchester Ship Canal
Towards the end of the 19th century, a large project required major line deviations and the construction of major new bridges. This was the building of the Manchester Ship Canal, which would take ocean-going vessels directly from Liverpool to Manchester.
When the railways were first planned, assurances had had to be made that any crossings of rivers or canals would not prevent ships from uninterrupted passage on any of those waters, or any future canals. Railways were to have their bridges made to swing or cross with 100 feet of headroom, as was first envisaged, for clearance. Although swinging bridges carrying main roads across canals were acceptable it was considered impractical for railway lines. So, new high-level bridges were constructed at a height of around 75 feet above the water level of the new Manchester Ship Canal, and this required the construction of railway deviations with suitable gradients.
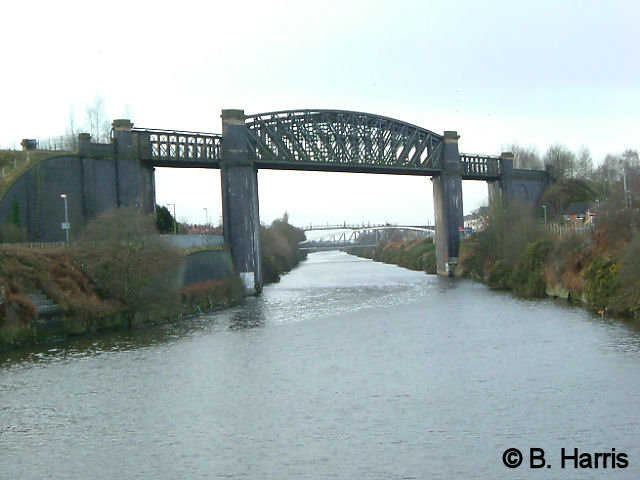
A skew bridge carries the Warrington to Stockport Railway deviation across the MSC just to the west of Latchford Locks. This is a hog-backed steel girder bridge with a span of 250 feet supported on piers constructed of blue brickwork; the weight of the steel work in this bridge being 1,220 tons.
The piers of this bridge are a mammoth feat of brickwork and, on completion, the bridge was tested under the weight of six locomotives. The new railway viaducts and track deviations were subject to inspection by officers of the Board of Trade.
Through the centre of the viaduct can be seen the Latchford Locks. While the viaduct was being tested, the original double track had to remain intact, and in use, thereby preventing complete excavation of the canal channel.
The line of the original railway would have crossed, obliquely, across the line of the canal on the west side of the new high level bridge, midway between the two bridges shown.
The Latchford viaduct was opened for goods traffic in February 1893, but not until July of that year did the railway Inspectorate pass it as fit for passenger trains. The last pieces of land were released, and work could commence on cutting through the final sections, thus severing the original line. On the north side of the MSC part of the line was kept as sidings and part was used by the MSC’s own industrial railway.
The alignment of the new High Level Bridge required a new approach to it. The height of the bridge also required a gradual incline.

Looking east towards Latchford Locks from the Knutsford Road swing bridge.
The view looking west towards Latchford was, was taken from one of the stone piers of Latchford Locks. Through the centre of the viaduct can be seen the swing bridge carrying Knutsford Road.
To keep the ruling incline to an acceptable one, the deviation started about a quarter of a mile to the east of the Stockport Road underpass to the south of what now is the British Legion. This meant constructing a new underpass a few yards to the north of the old one, the sandstone abutments of which can be seen through the trees in the centre of the picture, left. The photo, right, shows just how close the two underpasses were.
However, the result of this slight deviation meant that from the new underpass the track was perfectly lined up with the High Level Bridge, which can be seen in the distance in the photo here.
While the canal was under construction, the railway had to carry on working without disruption. To the west of the Latchford and Grappenhall Station a new cantilever high-level road bridge was built to span the canal. Because the railway was still being used at the side of the proposed canal, abutments had to bridge the railway track on its way to Wash Lane level crossing.
After crossing the Latchford viaduct, two new overpasses took the line over Knutsford Road and Grappenhall Lane, along the north side of Station Road, doing away with two level crossings.
In the photo, looking east along Common Lane, the underpasses in the abutments are clearly shown. This lane was the original line of the railway track.
A new high-level station, called Latchford Station, was built to the west of the Grappenhall Lane overpass.
The booking office was on the same level as Station Road and was of typical LNWR wooden construction.
Steps led up to the platforms and there was a subway to the Manchester-bound side.
The station waiting room was on the Manchester-bound side. The LNWR prefabricated the buildings at its Crewe works, transported them to the site and erected them.
They were without canopies and the platforms were also made of wood. The station had gaslights all its life.
Grappenhall Lane, on the east side of the station, was severed by the canal. The lane on the south side of the canal was renamed Hill Top Road, while the northern end of the lane was renamed Grammar School Road.
Latchford signal box was situated just beyond the western end of the new station on the south side of the line. It was an eighteen-lever frame box. While it had a typical wooden cabin, the usual brick base was not used, as was the case when there was the possibility of unstable ground, as here on the embankment. From here there was an overpass over Wash Lane, shown in the photo, right. Also to be seen, on the right of the picture, is the chip shop which is referred to in Chapter 5.

This photo is taken from the bottom of Hilltop Road looking north over the canal towards the overbridge over Grammar School Road. The building directly ahead is on the other side of the canal and is built on what would have been the level crossing. To the left of the building would have been the old station.
Within 200 yards of the above bridge is another overbridge which the locals used to call ‘Caravan Entry’ because they thought that gipsies lived in a caravan just under the bridge.
This overbridge replaced the pedestrian level crossing, which the farmer used to get to his fields (now Woolacombe Close – see Chapter 4).
From here the line passed over the Black Bear Canal by means of a new overpass which was situated about 30 yards to the northeast of the original overpass.
There was then another overbridge at the end of Park Lane, probably with the intention of continuing Park Lane under it.
It then merged into the original line just before Wilderspool level crossing over Chester Road.
Chapter 4 – The Route of the Line as it is Now

This section was designated as part of the Trans-Pennine Trail in 1989, which runs from Southport on the west coast, to Hornsea on the East Coast, and opened in 1993.
Before the track was laid down, a new sewerage pipeline was entrenched on part of this section, which terminated at the River Bollin.
A further section of the Trail, 3 miles eastwards from the River Bollin towards Altrincham, was completed in 1996.

Going westwards from the River Bollin, we come to Heatley & Warburton Station, seen above.
The station waiting room still stands on the north side but both platforms have been demolished, as has the controlled level crossing.

At the westward end of the station building is the crossing-keeper’s cottage, shown above, which is now a private residence on Mill Lane.
The photograph was taken from where the original signal box stood. Crossing over Mill Lane, on the south side of the track we see the Railway Hotel.

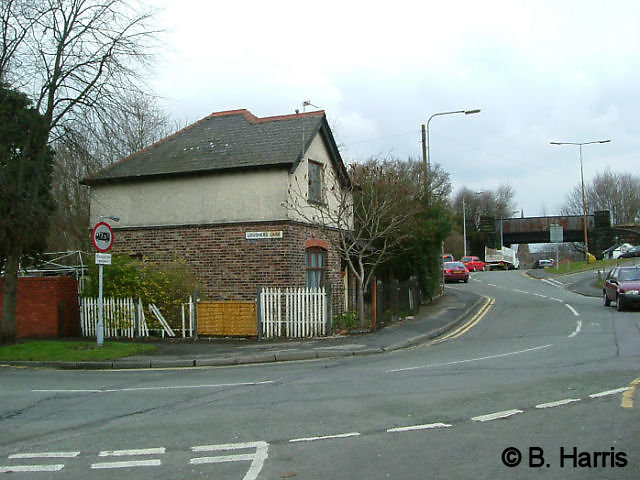
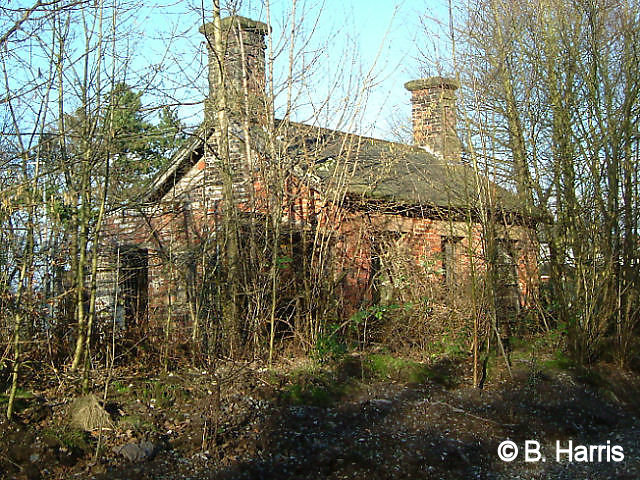
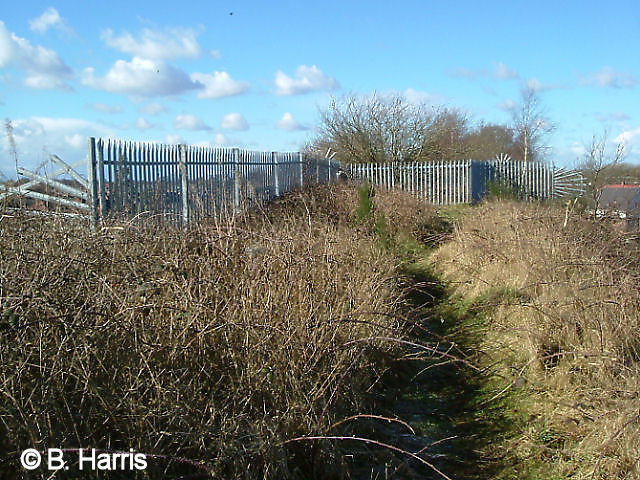
The next level-crossing site is on Rush Green Road/Birchbrook Road. On the left-hand side, before crossing the road, is the crossing-keeper’s cottage.
It is numbered 234 and looks as if it might have been a private residence. It is now empty and boarded up. See photo, above.
Reddish Lane is the site of the next minor level crossing followed by Lymm Hay Lane. There is nothing of note at these two locations as they were unmanned crossings without barriers.
Next we come to a small overbridge due to a farm access track, and then we come to a more substantial bridge that carried the tracks over Sow Brook, which drains Lymm Dam into the Manchester Ship Canal. The bridge over Sow Brook is shown right.

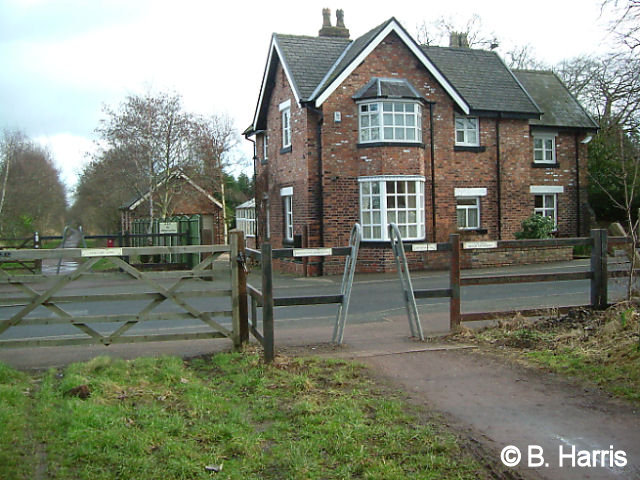
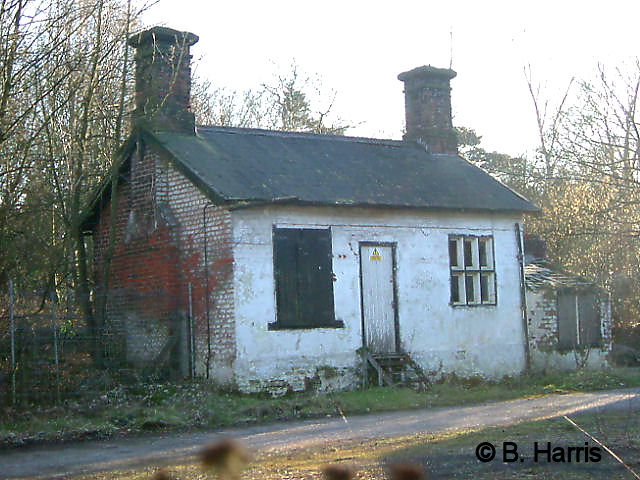
Shortly we come to the site of Lymm Station preceded by what was a controlled level crossing over Whitbarrow Road. The Station Master’s House on the north side of the track is now a private residence.
Whitbarrow Road crossing-keeper’s cottage is shown left. Behind this cottage, and attached to it, are the remains of the abutment of a footbridge which crossed the line to the south side.

This would have been used when the crossing gates were closed to road traffic in order to get from one platform to the other. A bit further on, behind the cottage, was the site of the station buildings. A Rangers Cabin now stands here while a car park is situated where the south-side platform used to be. On the south side of the track, and adjacent to the road, is a hotel, formerly called the Lymm Hotel.
What remains of the footbridge abutments attached to the rear of the cottage is shown in the photo here.
Star Lane is the next road we come to. Here the track is about 60 yards to the north of the Bridgewater Canal. The photo, above, looking eastwards, shows the crossing keeper’s cottage, an imposing modern residence.

After we have left Star Lane the track passes under a pedestrian footbridge, seen here. This preserved the right-of-way between Yield Brow, to the south of the track, and Warrington Road to the north.
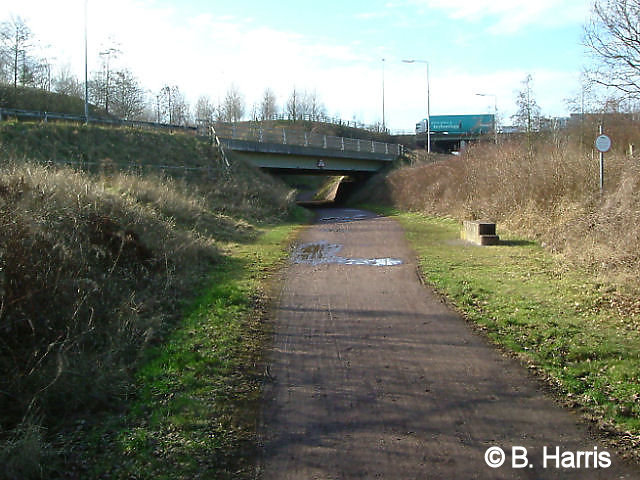
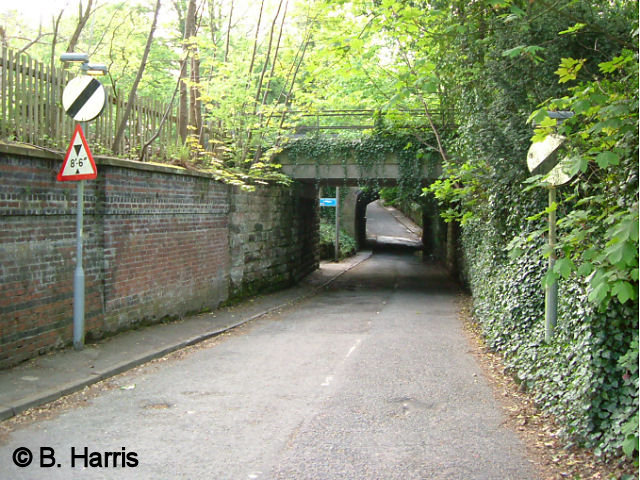
The original Camsley Lane underpass was untouched when the first M6 viaduct was constructed in 1963. In 1995 the construction of the new viaduct, due to the M6 widening, meant that Camsley Lane had to be re-aligned. It was also lowered so that the track underpass is of a restricted height. This means that horse-riders must dismount. Mounting/dismounting blocks are located at each end of the underpass. One can be seen on the right in the photo, above.
From the underpass the line went straight ahead under the first viaduct. When the second viaduct was built, the trail was sloped up and diverted to run alongside Camsley Lane under both viaducts. Then a sharp left bend followed by a sharp right bend and a slope down brought it back to the original line of the track.
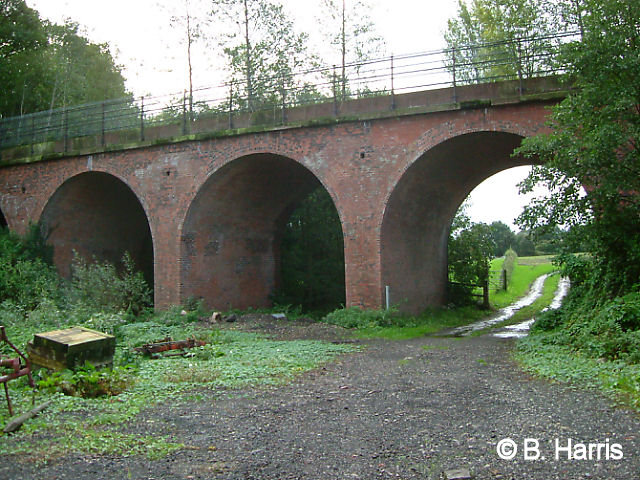
Immediately there is a farm access underpass. We then find ourselves crossing over a five-arch brick viaduct. This was built to cross a dip in the fields through which runs Massey Brook, which now discharges into the Manchester Ship Canal. The photo, right, shows the middle three arches. The brook runs through the one on the left.
The next underpass is at Deans Lane, after which we come to Thelwall Station. The photo, left, shows the underpass shortly after the Trail was opened in 1993. It clearly shows wooden railings in place to separate the pedestrian track from the bridleway.

A few Guy Fawkes nights later and the scene is different in the photo here.
Thelwall Station building is still there on the north side of the track but the platforms on both sides have gone (photo, above).
Behind the station building was the station yard with access from Stockport Road. This is now a building site, and the station building has been incorporated into the new multi-storey building.

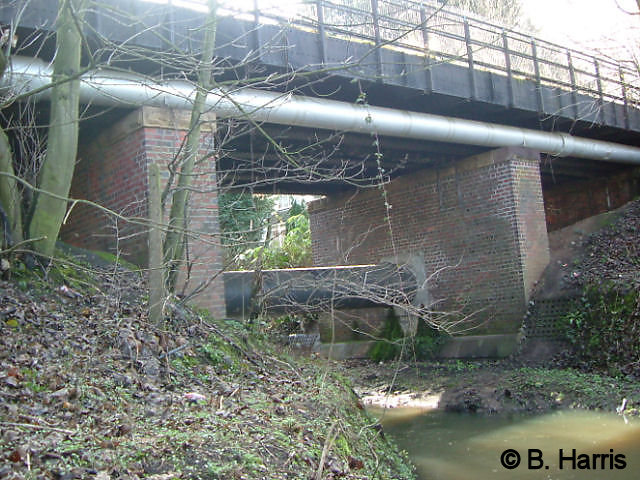
From here Stockport Road and the Bridgewater Canal come very close to each other for a short distance and the track just squeezes in between them. At the narrowest point there is an overbridge within yards of the canal aqueduct which passes over Half Acre Lane.
The photo, above, is taken from under the aqueduct, looking north towards Stockport Road, which lies immediately beyond the railway overbridge.

In a short distance the track passes over what used to be a minor level crossing over an access track leading from Stockport Road to some fields. A further 50 yards on and the track passes under Pickering Bridge (shown above). To the left of the picture there is another bridge very close to it, which goes over the Bridgewater Canal. The two if them maintain a right-of-way between Stockport Road (from opposite All Saints Drive) and Weaste Lane to the south.

Just as we approach the entrance to the British Legion Club (photo, above), which is on the north side of the track, the track makes a definite swing to the north. The swing of the track by the club marks the start of the deviation necessitated by the building of the Manchester Ship Canal.

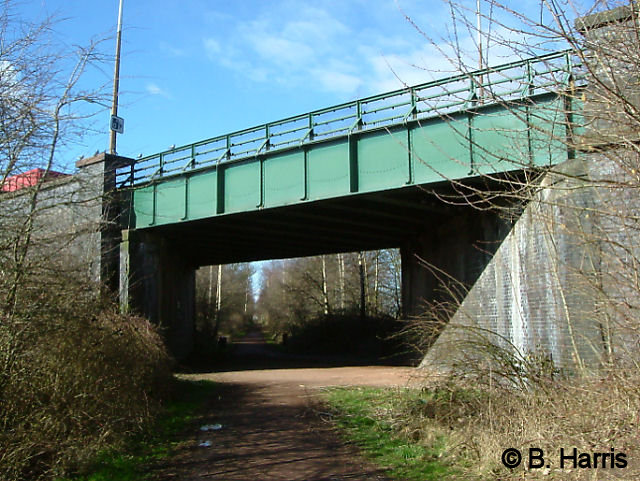
The photo, above, taken by the entrance to the British Legion, shows the track passing under the later Stockport Road Underbridge.
Here, at Stockport Road, can be seen two bridges side by side, but distinguished by the different building materials.
The original bridge on the south side of the track was built of sandstone (second photo).
From the Stockport Road underpass the line continues straight for just over half a mile. It also climbs on a gentle gradient to gain height for the crossing of the Thelwall High Level Bridge over the Manchester Ship Canal. Before the High Level Bridge, which can be seen in the far distance, we reach an overbridge carrying the track over Bradshaw Lane.
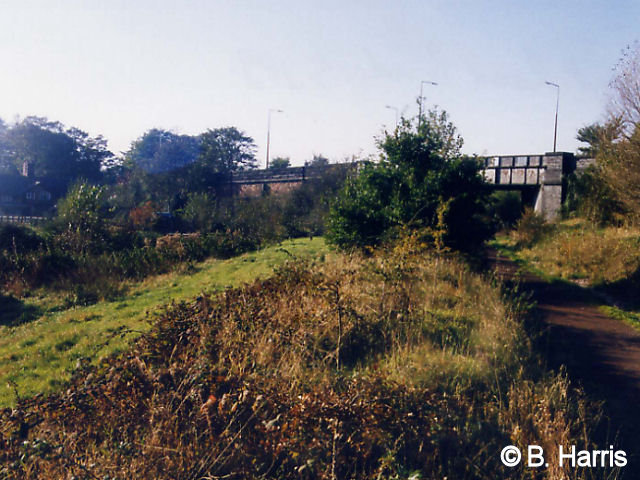
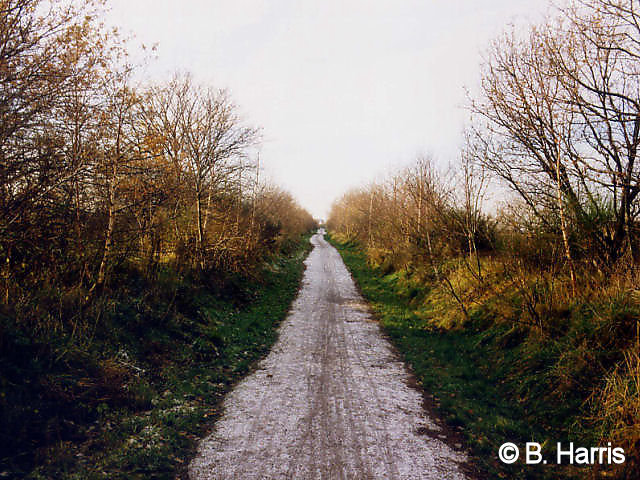
As shown in the photo, above, just before Bradshaw Lane overbridge, the utilization of the track for the Trans Pennine Trail comes to an end and the Trail drops down a slope onto Bradshaw Lane.

The track from here is deemed unsafe due to the bad condition of the High Level Bridge and is fenced off by means of railings across the track. The photo, right, shows Bradshaw Lane Overbridge and the descending slope of the Trail.

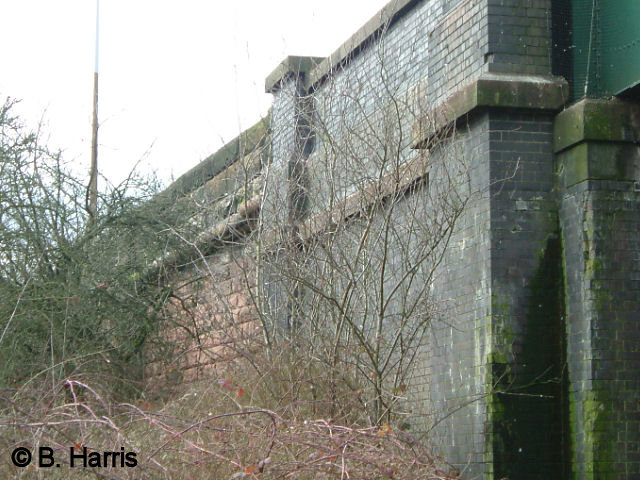
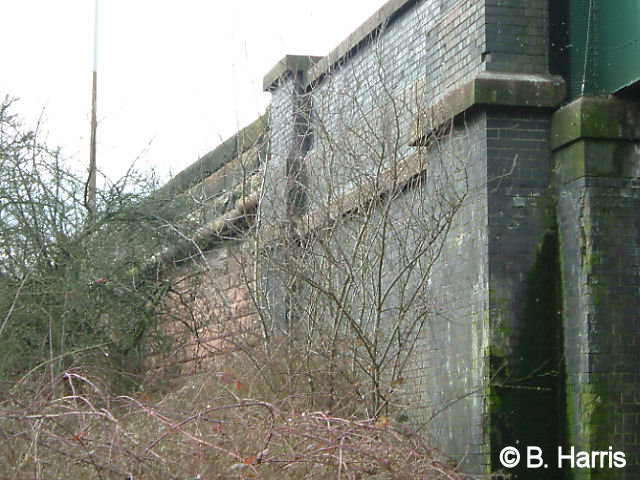
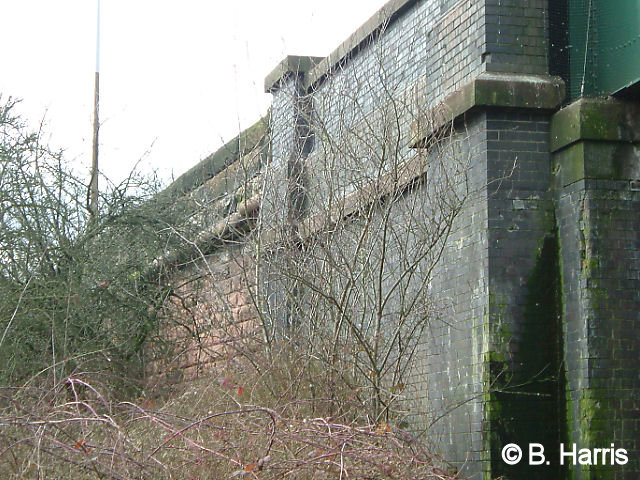
Walking down Bradshaw Lane to Thelwall New Road we see that the High Level Bridge is in a sorry state (photo, above). The steelwork is rusting and shrubs are growing at various points on the bridge.

The bridge is home to a large colony of pigeons, and the massive abutments, which were built of blue brick, are now disfigured with accumulated years of bird lime. The bird lime is also corroding the steelwork (photo, above).
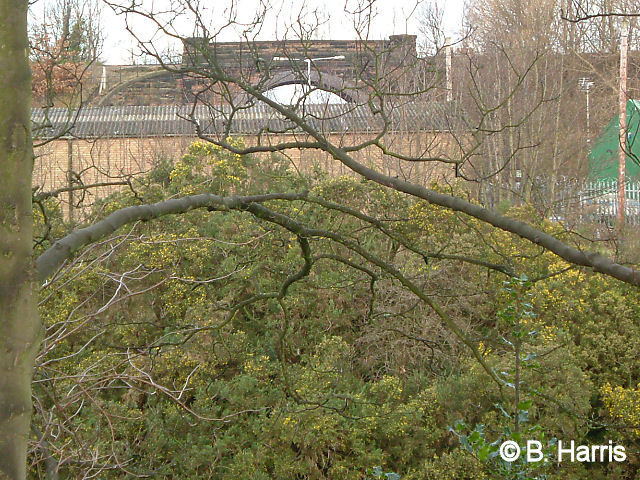
On the northern side of the High Level Bridge the track turns westwards to where Latchford overbridge takes it over Knutsford Road. The photo of Latchford overbridge, left, is taken looking south. Through the arch can be seen the steelwork of the swing bridge over the MSC. We can follow the route of the track by walking west along Thelwall New Road, turning right over the swing bridge, then immediately left into Station Road. After Latchford overbridge another overbridge took the track over Grammar School Road, before the track passed on the north side of Latchford Station buildings and yard.
Latchford Station closed to passengers on the 10 September, 1962, when all regular passenger services on the line ceased. The line continued to be heavily used for freight but mainly for the transportation of coal to Fiddlers Ferry Power Station.

The line also went to Garston Docks. As late as the early 1980s, there were 60 trains per day booked to use the line east of Warrington.
However, extensive and expensive repairs were needed to the High Level Bridge at Latchford. Because many trains were able to avoid the High Level Bridge by taking an alternative route, the line was closed east of Latchford. The last booked trains crossed over the High Level Bridge on 7 August, 1985.
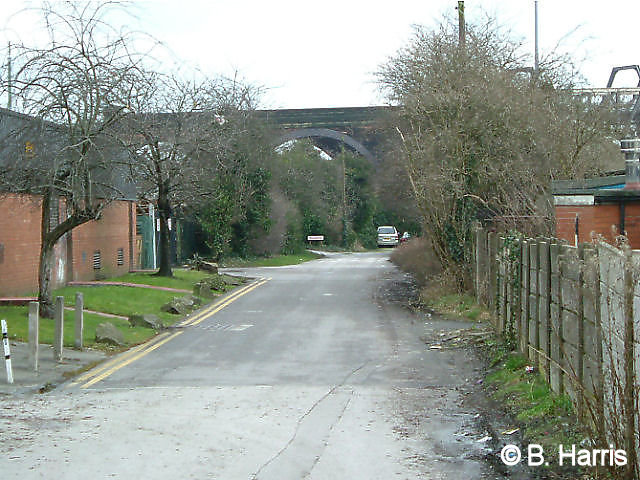
Latchford Station yard later became the site of a garden centre and, more recently, a building site. Immediately to the west of the station was a signal box, which was demolished a few years ago. Immediately after the signal box was an overbridge crossing Wash Lane. The photo, right, shows Grammar School Road overbridge, looking north. This was originally Grappenhall Lane. Continuing along Station Road, past the Cantilever Bridge on the left, the road comes to a T-junction. To the right can be seen Wash Lane overbridge.

The photo was taken from the junction with Station Road.

The photo, above, shows Wash Lane overbridge looking north. Instead of going under the overbridge we turn left and walk over what used to be the level crossing. Passing the crossing-keeper’s cottage on the right we turn right into Loushers Lane and take the first turning right into Woolacombe Close.
Directly ahead is a pedestrian right of way, which takes us under Caravan Entry overbridge. This was the pedestrian right of way, mentioned in Chapter 3, allowing the farmer to get to his fields, now Woolacombe Close.

This scene looks south towards Woolacombe Close. Carrying on along the path we come to Blackley Close. Turning right brings us to Wash Lane on the north side of the overbridge. Turning left we come to a T-junction with Knutsford Road when we turn right towards Warrington Bridge Foot. After crossing the Black Bear Park (created when the line of the canal was filled in) we take the first left into Park Avenue. Going the full length of Park Avenue we come to a dead end with the railway embankment running at right angles. There used to be an overbridge here, probably with the intention of continuing Park Avenue under it.
Certainly it was still there in 1952, as the photo, left, shows. Taken at the back of Loushers Lane Post Office, and looking over the Black Bear Canal, the overbridge is clearly seen. After Wash Lane overbridge the line descended gradually to pass over the Black Bear Canal and on to Arpley.
To get to the bridge over Black Bear Park we walk back from the dead end of Park Avenue for a few yards and turn right into Maple Grove. At the end of the street is an entrance onto Black Bear Park. Turning right we pass under the overbridge.
In the photo, right, we can see the overbridge which carried the line over the Black Bear Canal. It was much higher than the original bridge due to the line having to lose height gradually from the High Level Bridge to Bridge Foot level crossing. The overpass for the original line was situated approximately where the photographer was standing. From the Black Bear Park overbridge the embankment loses height gradually until it passes under the road bridge at Bridge Foot. The road bridge was built in 1957 to replace the level crossing.
Turning right off the canal, immediately after going under the bridge, is a footpath which runs through the old sidings, on the original Low Level Line, towards Bridge Foot. There are now no sidings to be seen and behind Priestley College a metal railing prevents further progress. On the other side of the fence the lines can still be seen and these are still used for shunting purposes. Walking back towards Black Bear Park the positions of the branch line sidings can still be seen as walking tracks. Occasionally, as one walks along, old sleepers, chairs and rail can be seen.


To get to Bridge Foot it is necessary to retrace our steps back to Knutsford Road. Turning left we come to the traffic lights at Bridge Foot. Here we turn left and walk up to the top of the bridge from where we can look in the direction of the Black Bear Canal (photo, above).
Keeping at low level while the embankment rises, are two lines which terminate at Black Bear Park. The branch line on the right terminates behind what is now Priestley College.
After the line passes under the road bridge at Bridge Foot it crosses over a girder bridge which spans the River Mersey and Arpley Road.
In the photo, above, looking north from Bridge Foot towards Arpley, one has a view along the girder bridge.

Another view of the girder bridge.
The line then continues past the signal box at Arpley Junction before going under Slutchers Lane road bridge to the former Bank Quay Low Level Station and beyond.
To get to Slutchers Lane it is necessary to go back to the traffic lights and turn left over the road bridge. Following the road round to the left we come to Slutchers Lane, which is on the left just before Bank Quay Station.
The photo, right, looks back, eastward, from Slutchers Lane road bridge towards Arpley Junction and the signal box. Before passing under Slutchers Lane a branch curves round to the left, going to Arpley Meadows and beyond.

Chapter 5 – Memories and Reflections
Memories of the Low Level by a Local Boy
In 1935, when I was 5 years of age, my family moved into the Post Office in Loushers Lane. In 1951, I lived in my wife’s family home in Secker Avenue. After a short time we moved to a police house in Loushers Lane and remained there until 1974. So, for almost 40 years, I could view both Low Level lines from where I lived.
In 1932, or 1923, my father had a shop built for him close to the bridge in Wash Lane. It is still standing today. My dad ran it as a newsagents and tobacconists but when he moved into the Post Office in Loushers Lane it became a chip shop, as it still is. In the past, goods train drivers would send their firemen down the embankment to get fish and chips while the train waited at the signal. No doubt they also got some for the signalman.
Mr Cockgreave lived at the crossing-keeper’s cottage on the original line crossing Wash Lane. When I moved to the police house in Loushers Lane this line was still being used by the MDC Company. Our garden came right up to this line and I could almost touch the saddle tanks. I would chat to the driver since he had to stop here to let his mate go and open the crossings.
Back to when I was a boy living at the post office, I knew the times of all the passenger trains and their engine numbers, it was the same ones on the same trains. Two would pass about 4.20, one on the ‘up’ and one on the ‘down’. I never knew which was which since neither was going up to London.
If I remember correctly, there were about 4 up to 9.00am and 2 at 1.10pm. Next came the 4.20pm. When I was at the Grammar School I could still see the trains and I remember Ma O’Brien who lived, I think, at Lymm. She would rush off and catch this 4.20pm train.
When I was courting, Dot and I would sit on an old tennis court roller in the field, which is now Woolacombe Close. I think it was the 9.20pm train that told us it was time to go home. We were only 14 at the time.
The war was on and I had seen the film ‘Ghost Train’ with Arthur Askey. This was a propaganda film about the train being run by Nazis carrying guns. At about midnight a mail train would leave Bank Quay Low Level going to Normanton. As a boy I imagined it full of Nazis and you could still see the glare from the firebox even though they had canvas sheeting during the blackout.
It was a steep incline and often goods trains couldn’t make it and had to wait for another engine to get them over the bridge at the Manchester Ship Canal.
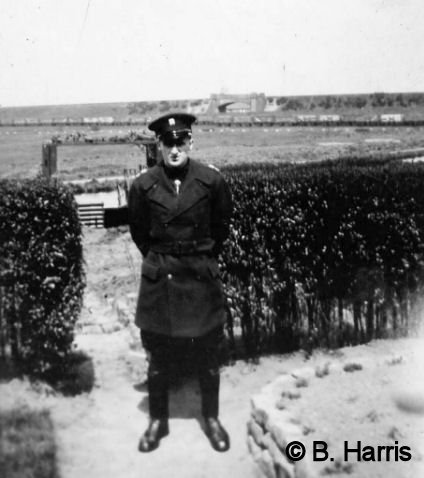
The person who worked at Latchford Station would come to the Post Office to buy his cigarettes. He was the Station Master, booking-office clerk and ticket collector. He would close the station during the morning and afternoon. I remember him well; he spent hours in the shop, in his uniform, chatting to dad. I never knew his name; we called him ‘bad teeth’ (not to his face). His teeth were horrible.
I spent many hours on Latchford Station watching the trains and the coal wagons taken into the siding. I got to know the signals – there was a home and a starter on the same post – and Mrs Hands, off the estate, was one of the signal operators.
I was lucky on one occasion whilst on Latchford Station, getting to go on the footplate to Bank Quay. I remember the driver telling me to duck down so the signalman wouldn’t see me.
On the 13 May, 1949, I was with Dot on Latchford Station and we got engaged.
We had friends who lived in Statham. We would catch the 4.20 to Lymm and return on the 11.something. This train terminated at Bank Quay.
Appendix 1 – Glossary
LNWR – London and North Western Railway
L&M – Liverpool and Manchester
W&N – Warrington and Newton
SHCR – St Helens Canal and Railway
BLCJR – Birkenhead, Lancashire and Cheshire Junction Railway
W&S – Warrington and Stockport
GJR – Grand Junction Railway
CLC – Cheshire Lines Committee
GN&M – Great Northern and Midland
GWR – Great Western Railway
MSL – Manchester, Sheffield and Lincolnshire
Appendix 2 – Diagram of the Line Before and After the MSC

Many thanks to you, Bert, for an excellent contribution to the mywarrington website.
